いざという時のために、ドライブにUbuntuのISOイメージを保存しておき、そのISOイメージから起動出来るようにしてみました。
目次
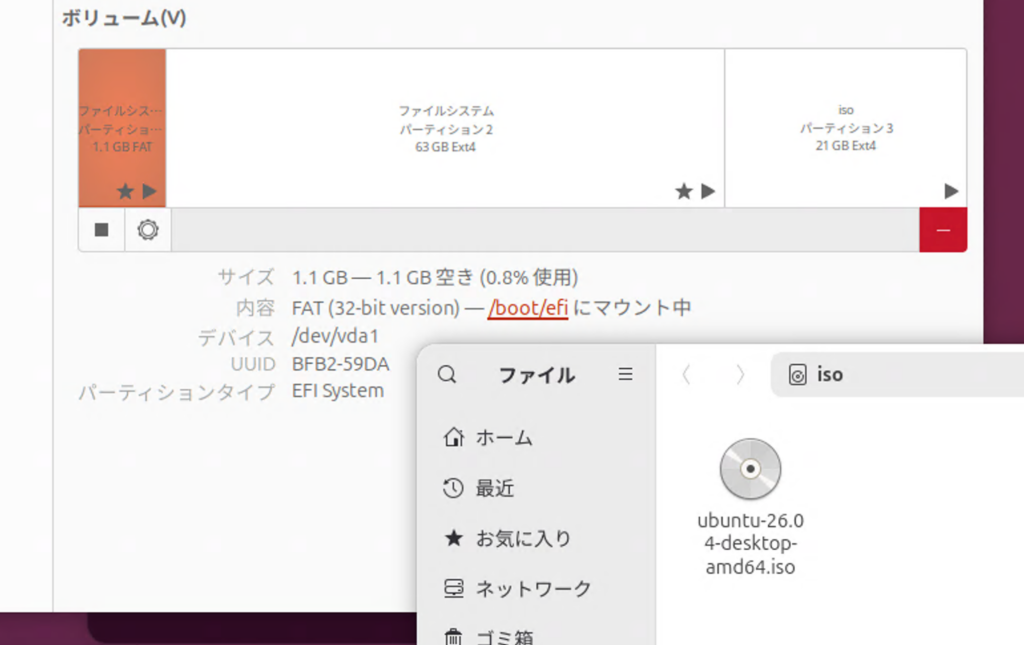
後半パーティションにISOを保存
ディスク後半にext4パーティションを用意して、そこにUbuntuのISOイメージを保存します。
これからコピーする場合で、/dev/nvme0n1p3 を /iso にマウントする例は下記。
# マウントポイントの作成
sudo mkdir /iso

# パーティションをマウント
sudo mount /dev/nvme0n1p3 /iso

# 所有者変更と書き込み権限を付与
sudo chown $USER:$USER /iso
chmod u+rwx /iso
スクリプトでGRUBメニューに項目を追加
ISOイメージの準備ができたら、下記スクリプトを実行します。
nano isoboot-grub.sh
sudo bash isoboot-grub.sh
#!/usr/bin/env bash
# =============================================================================
# isoboot-grub.sh
# ISOブート用パーティション確認 → GRUB エントリ追加スクリプト
# 前提:ISOファイル入りのext4パーティションが既に存在すること
# =============================================================================
set -euo pipefail
RED='\033[0;31m'; GREEN='\033[0;32m'; YELLOW='\033[1;33m'
CYAN='\033[0;36m'; BOLD='\033[1m'; RESET='\033[0m'
info() { echo -e "${CYAN}[INFO]${RESET} $*"; }
success() { echo -e "${GREEN}[OK]${RESET} $*"; }
warn() { echo -e "${YELLOW}[WARN]${RESET} $*"; }
error() { echo -e "${RED}[ERROR]${RESET} $*" >&2; }
die() { error "$*"; exit 1; }
hr() { echo -e "${CYAN}$(printf '=%.0s' {1..70})${RESET}"; }
confirm() {
local ans
while true; do
echo -en "${YELLOW}[確認]${RESET} $1 [y/N]: "
read -r ans
case "$ans" in
[yY]*) return 0 ;;
[nN]*|"") return 1 ;;
*) echo " y または n を入力してください。" ;;
esac
done
}
# -----------------------------------------------------------------------------
check_root() {
[[ $EUID -eq 0 ]] || die "sudo で実行してください。\n 例: sudo bash $0"
}
check_deps() {
local missing=()
for cmd in lsblk blkid mount umount file grub-mkconfig update-grub; do
command -v "$cmd" &>/dev/null || missing+=("$cmd")
done
[[ ${#missing[@]} -eq 0 ]] || die "コマンドが見つかりません: ${missing[*]}"
}
# -----------------------------------------------------------------------------
# ステップ1: ISOが入ったパーティションを選択
# -----------------------------------------------------------------------------
select_partition() {
hr
echo -e "${BOLD}【ステップ 1/3】ISO パーティションの選択${RESET}"
hr
echo ""
info "現在のパーティション一覧:"
echo ""
lsblk -o NAME,SIZE,FSTYPE,LABEL,MOUNTPOINTS | grep -v loop
echo ""
while true; do
echo -en "${BOLD}ISOが入ったパーティションを入力${RESET} (例: vda3, sda4, nvme0n1p3): /dev/"
read -r part_name
PART_DEV="/dev/${part_name}"
if [[ ! -b "$PART_DEV" ]]; then
error "${PART_DEV} はブロックデバイスではありません。再入力してください。"
continue
fi
local fstype
fstype=$(lsblk -no FSTYPE "$PART_DEV" 2>/dev/null || true)
if [[ "$fstype" != "ext4" ]]; then
warn "${PART_DEV} のファイルシステムは ${fstype:-不明} です(ext4 を想定)。"
confirm "このまま続けますか?" || continue
fi
echo ""
info "${PART_DEV} の情報:"
lsblk -o NAME,SIZE,FSTYPE,LABEL,UUID,MOUNTPOINTS "$PART_DEV" 2>/dev/null || true
echo ""
confirm "${PART_DEV} を使用しますか?" && break
done
success "対象パーティション: ${PART_DEV}"
# UUID取得(デバイス名非依存・VM/実機共通)
PART_UUID=$(blkid -s UUID -o value "$PART_DEV")
if [[ -z "$PART_UUID" ]]; then
die "UUIDを取得できませんでした: ${PART_DEV}"
fi
success "UUID: ${PART_UUID}"
}
# -----------------------------------------------------------------------------
# ステップ2: ISOファイルの確認と起動パス検出
# -----------------------------------------------------------------------------
inspect_isos() {
hr
echo -e "${BOLD}【ステップ 2/3】ISO ファイルの確認${RESET}"
hr
echo ""
MOUNT_POINT="/mnt/isoboot_grub_$$"
mkdir -p "$MOUNT_POINT"
mount "$PART_DEV" "$MOUNT_POINT"
info "${PART_DEV} を ${MOUNT_POINT} にマウントしました"
echo ""
# ISOファイルを列挙
mapfile -t iso_candidates < <(find "$MOUNT_POINT" -maxdepth 2 -name "*.iso" 2>/dev/null)
if [[ ${#iso_candidates[@]} -eq 0 ]]; then
umount "$MOUNT_POINT"; rmdir "$MOUNT_POINT"
die "ISOファイルが見つかりませんでした。パーティションにISOを配置してから再実行してください。"
fi
info "見つかったISOファイル:"
for i in "${!iso_candidates[@]}"; do
local size
size=$(du -sh "${iso_candidates[$i]}" 2>/dev/null | cut -f1)
echo " [$((i+1))] ${iso_candidates[$i]##"$MOUNT_POINT"} (${size})"
done
echo ""
ISO_ENTRIES=() # "iso_path:vmlinuz:initrd:boot_type" の配列
for iso_full in "${iso_candidates[@]}"; do
local iso_rel="${iso_full##"$MOUNT_POINT"}"
local iso_name
iso_name=$(basename "$iso_full")
echo ""
info "--- ${iso_name} を検査中 ---"
if confirm "${iso_name} をGRUBメニューに追加しますか?"; then
local paths
paths=$(detect_boot_paths "$iso_full")
local vmlinuz="${paths%%:*}"
local rest="${paths#*:}"
local initrd="${rest%%:*}"
local boot_type="${rest##*:}"
if [[ "$vmlinuz" == "UNKNOWN" ]]; then
warn "カーネルパスを自動検出できませんでした。手動入力してください。"
echo -en " vmlinuz のパス (例: /casper/vmlinuz): "
read -r vmlinuz
echo -en " initrd のパス (例: /casper/initrd): "
read -r initrd
boot_type="custom"
else
success "カーネル : ${vmlinuz}"
success "initrd : ${initrd}"
success "起動方式 : ${boot_type}"
fi
ISO_ENTRIES+=("${iso_rel}:${vmlinuz}:${initrd}:${boot_type}")
else
info "スキップ: ${iso_name}"
fi
done
umount "$MOUNT_POINT"
rmdir "$MOUNT_POINT"
success "アンマウント完了"
if [[ ${#ISO_ENTRIES[@]} -eq 0 ]]; then
die "追加するエントリがありません。終了します。"
fi
}
# ISOをループマウントして起動パスを自動検出
detect_boot_paths() {
local iso_path="$1"
local tmp="/mnt/iso_inspect_$$"
mkdir -p "$tmp"
if ! mount -o loop,ro "$iso_path" "$tmp" 2>/dev/null; then
echo "UNKNOWN:UNKNOWN:custom"
return
fi
local vmlinuz="" initrd="" boot_type=""
if [[ -f "$tmp/casper/vmlinuz" ]]; then vmlinuz="/casper/vmlinuz"; initrd="/casper/initrd"; boot_type="casper"
elif [[ -f "$tmp/casper/vmlinuz.efi" ]]; then vmlinuz="/casper/vmlinuz.efi"; initrd="/casper/initrd.lz"; boot_type="casper"
elif [[ -f "$tmp/live/vmlinuz" ]]; then vmlinuz="/live/vmlinuz"; initrd="/live/initrd.img"; boot_type="live"
elif [[ -f "$tmp/live/vmlinuz.efi" ]]; then vmlinuz="/live/vmlinuz.efi"; initrd="/live/initrd.img"; boot_type="live"
else
# フォールバック:vmlinuz を再帰検索
local found
found=$(find "$tmp" -name "vmlinuz*" | head -1 || true)
if [[ -n "$found" ]]; then
vmlinuz="${found##"$tmp"}"
local dir
dir=$(dirname "$found")
initrd=$(find "$dir" -name "initrd*" | head -1 || true)
initrd="${initrd##"$tmp"}"
boot_type="custom"
else
vmlinuz="UNKNOWN"; initrd="UNKNOWN"; boot_type="custom"
fi
fi
umount "$tmp"; rmdir "$tmp"
echo "${vmlinuz}:${initrd}:${boot_type}"
}
# -----------------------------------------------------------------------------
# ステップ3: GRUBエントリ追加
# -----------------------------------------------------------------------------
add_grub_entries() {
hr
echo -e "${BOLD}【ステップ 3/3】GRUB エントリの追加${RESET}"
hr
echo ""
local custom_file="/etc/grub.d/40_custom"
cp "$custom_file" "${custom_file}.bak.$(date +%Y%m%d_%H%M%S)"
info "40_custom をバックアップしました"
echo ""
for entry in "${ISO_ENTRIES[@]}"; do
local iso_rel vmlinuz initrd boot_type menu_label
IFS=':' read -r iso_rel vmlinuz initrd boot_type <<< "$entry"
menu_label=$(basename "$iso_rel" .iso)
local params=""
case "$boot_type" in
casper) params="boot=casper iso-scan/filename=\$isofile quiet splash ---" ;;
live) params="boot=live iso-scan/filename=\$isofile quiet splash" ;;
*) params="iso-scan/filename=\$isofile quiet splash" ;;
esac
local grub_entry
grub_entry=$(cat <<EOF
menuentry "${menu_label} (ISO Loop Boot)" {
insmod part_gpt
insmod ext2
insmod loopback
insmod iso9660
search --no-floppy --fs-uuid --set=isodev ${PART_UUID}
set isofile="${iso_rel}"
loopback loop (\$isodev)\$isofile
linux (loop)${vmlinuz} ${params}
initrd (loop)${initrd}
}
EOF
)
echo -e "${CYAN}追加予定エントリ:${RESET}"
echo "$grub_entry"
echo ""
if confirm "このエントリを追加しますか?"; then
echo "$grub_entry" >> "$custom_file"
success "追加しました: ${menu_label}"
else
warn "スキップ: ${menu_label}"
fi
done
echo ""
info "GRUB を更新中..."
if update-grub 2>&1; then
success "update-grub 完了"
else
warn "update-grub でエラーが発生しました。手動で確認してください:"
warn " sudo update-grub"
fi
}
# -----------------------------------------------------------------------------
# 完了サマリー
# -----------------------------------------------------------------------------
print_summary() {
hr
echo -e "${BOLD}${GREEN}【完了】セットアップサマリー${RESET}"
hr
echo ""
echo -e " 対象パーティション : ${BOLD}${PART_DEV}${RESET}"
echo -e " パーティションUUID : ${BOLD}${PART_UUID}${RESET}"
echo -e " 追加エントリ数 : ${BOLD}${#ISO_ENTRIES[@]}${RESET}"
echo ""
echo -e "${YELLOW}【次のステップ】${RESET}"
echo " 1. 再起動して GRUB メニューに新しいエントリが表示されることを確認"
echo " 2. 起動に失敗した場合は /etc/grub.d/40_custom を確認し"
echo " カーネルパスを修正後 sudo update-grub を再実行"
echo ""
warn "バックアップ: /etc/grub.d/40_custom.bak.* に保存済み"
hr
}
# -----------------------------------------------------------------------------
main() {
clear
hr
echo -e "${BOLD} isoboot-grub.sh — ISO ブート GRUB エントリ 追加スクリプト${RESET}"
echo -e " 前提: ISOファイル入りのext4パーティションが既に存在すること"
hr
echo ""
check_root
check_deps
select_partition
inspect_isos
add_grub_entries
print_summary
}
main "$@"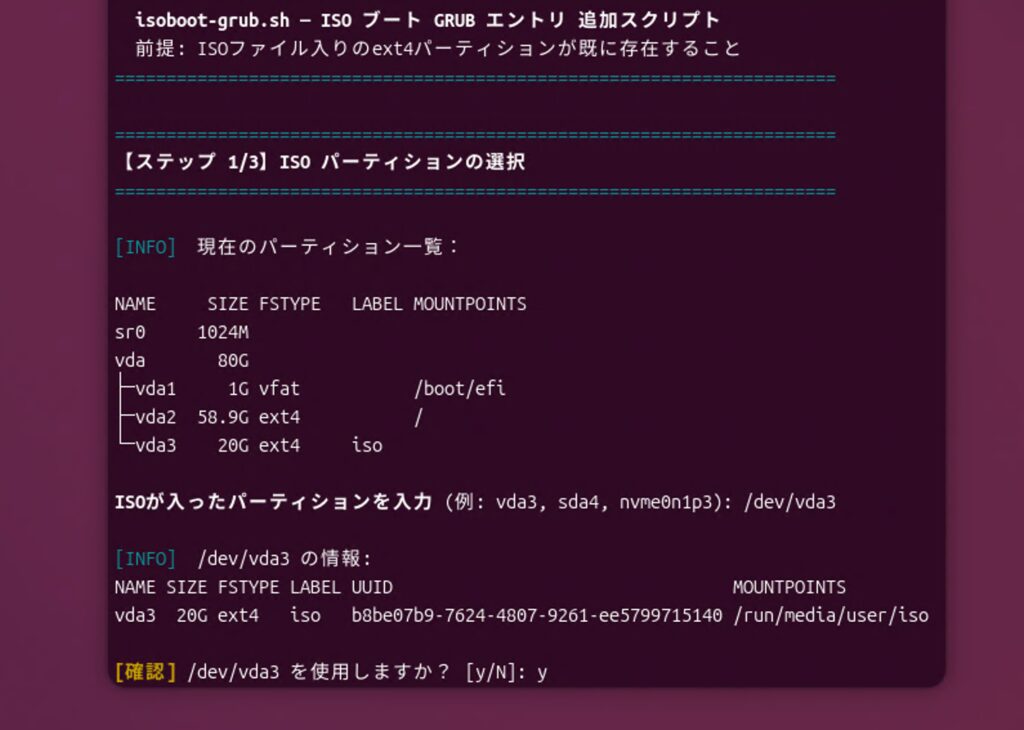
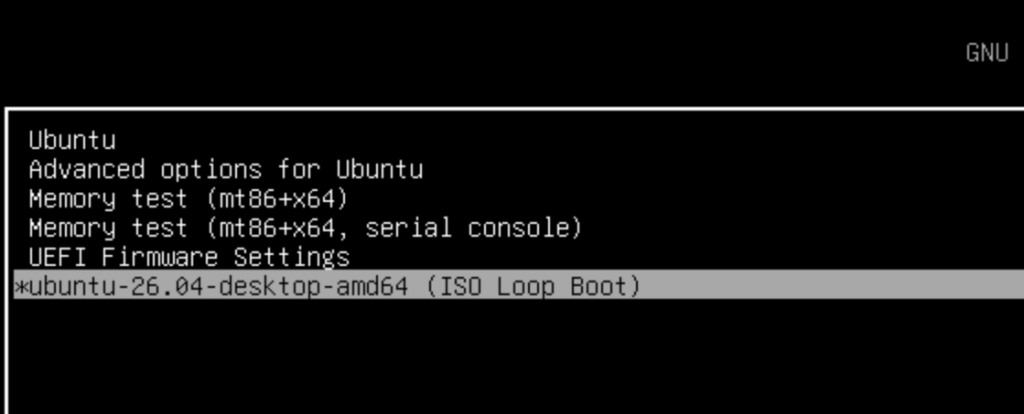
GRUBメニューでISOイメージを選択して起動
再起動してGRUBメニューを表示します。UEFI環境ならEscキー、BIOSならShiftキーをタイミングよく押します。
ちなみに、生成されたGRUBエントリは次のようになっています。
menuentry "Ubuntu 26.04 Live ISO (ISO Loop Boot)" {
    insmod part_gpt
    insmod ext2
    insmod loopback
    insmod iso9660
    search --no-floppy --fs-uuid --set=isodev b8be07b9-xxxx-xxxx-xxxx-xxxxxxxxxxxx
    set isofile="/ubuntu-26.04-desktop-amd64.iso"
    loopback loop ($isodev)$isofile
    linux  (loop)/casper/vmlinuz boot=casper iso-scan/filename=$isofile quiet splash ---
    initrd (loop)/casper/initrd
}
gpartedでパーティション編集
パーティション編集用ににgpartedをインストールするなら下記。
sudo apt update
sudo apt install -y gparted
GRUBエントリの場所
GRUBエントリは複数のファイルに関係しています。
編集用(ここを変更する)
/etc/grub.d/40_custom
今回追記したカスタムエントリの保存場所。update-grub を実行するたびにここが読み込まれます。
sudo nano /etc/grub.d/40_custom実際に起動時に使われる(自動生成・直接編集不可)
/boot/grub/grub.cfg
update-grub が /etc/grub.d/ 以下の全ファイルを合成して自動生成するファイル。直接編集しても次の update-grub で上書きされます。
確認するなら
grep -A 12 "ISO Loop Boot" /boot/grub/grub.cfg関係するファイルの全体像
/etc/default/grub        ← タイムアウトやデフォルト項目などの設定
/etc/grub.d/
  ├── 00_header          ← GRUB基本設定(自動)
  ├── 10_linux           ← インストール済みLinuxの検出(自動)
  ├── 40_custom          ← カスタムエントリ ← ここを編集
  └── ...
        ↓ update-grub
/boot/grub/grub.cfg      ← 起動時に実際に読まれる(自動生成)
つまり 編集は 40_custom、反映は update-grub が基本の流れです。